


I love to make Subway art for each holiday, but my little cheap black frame from the dollar store for the subway art just wasn't cuttin' it any more. Not to mention it was falling apart and the prints were getting all bent up moving them in and out and storing them. I love a project that can be interchangeable, so I LOVE, LOVE this idea from Poppy Seed Projects! This plaque is made with one of the Christmas printables which is PERFECT for a Christmas in July project!

This would be a perfect Super Saturday project!
Its so easy to make and it can stay up all year round because I have included subway art prints that are quotes too. You can paint it to match your décor and each square plaque can be painted to match the print you are attaching it to. So easy to switch for a different season because the square plaque is attached using 3M Velcro Strips!


I cut the 3M Strips in half lengthwise
(you can find the ones I used at any Home Improvement or most grocery
stores).


DOWNLOAD THE FREE SUBWAY ART HERE!
This would be a perfect Super Saturday project!
Its so easy to make and it can stay up all year round because I have included subway art prints that are quotes too. You can paint it to match your décor and each square plaque can be painted to match the print you are attaching it to. So easy to switch for a different season because the square plaque is attached using 3M Velcro Strips!
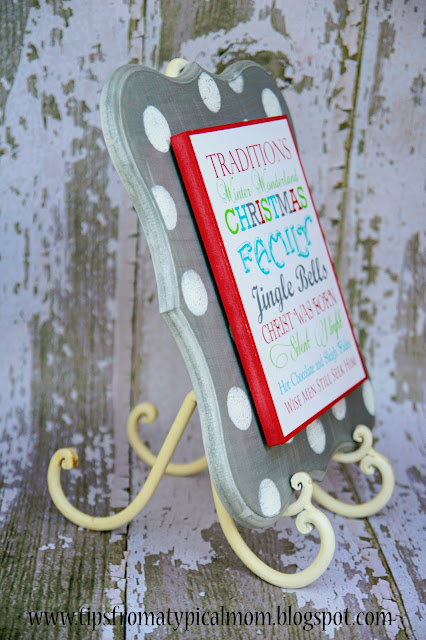
Here is a little peek at just SOME of
the printables you can download for FREE over on my blog: TipsFrom a Typical Mom!

I used the Elenaor
Plaque from Poppy Seed Projects. It's only $9.95 and it comes
unfinished. The square interchangeable piece is their “scrap wood”about 7x9”. You will need one piece of scrap wood for each sign
you want to make. Today I am making a Christmas plaque.


I painted my plaque to look a little
like stainless steel. I used Krylon Metallic Matte Aluminum indoor spray paint.

I went outside and spray painted it
using a poster board to catch the mess.

It took about 4 coats to make it look
really like a metal plaque. After it was dry, I sanded it in
straight lines sideways and up and down to give it a textures
stainless steel look.


Wipe with a damp paper towel to remove
the extra dust after sanding.

Now for the polka dots. I used a round
sponge brush (normally used for stencils) to make mine so they looked
a little more sloppy. I didn't want perfect dots :)
I dipped the brush in white paint and
dabbed off the excess. Just as you would for stenciling.
I randomly placed the dots, using light
pressure and twisting around then lifting straight up. After those
were dry I added another coat.

After the dots were dry, I lightly
sanded them to give them a distressed look. Then I was done with the
plaque. You can spray the plaque with a finishing spray if desired.
Next I painted the edges of the square
plaque a color to match the subway art. I chose red.


After it was dry I added a thick coat
of Modge Podge, carefully placed the subway art and smoothed out any
bubbles. You just paint the Modge Podge on like a thick layer of
paint all over the plaque, even over the red. It dries clear and
shiny.
After that was dry, I added another
coat of Modge Podge over the subway art and plaque to seal the print.
I also used the sponge brush across and up and down to give the
print a linen look. Let dry!

Now it's time to put the subway art
plaque on the shaped plaque.


I put the two Velcro pieces together
then take the sticky part off one side and stick it to the short side
of the square plaque. I measured 1” down and 2” from the side to
place the strips like so:

Repeat for the bottom. (So you will
only use 2 total strips because you cut it in half).
Now it's time to add the art to the
plaque. This is where I don't stay very technical ;)
I left the command wax paper on the
strips as you can see in the picture above so that I could measure
and make sure it was exactly on center. I measured from all four
sides to make sure it was centered.
My measurements were 1 ¾” from each
side.

Then I pressed down on the left side of
the square plaque to keep it from shifting and lifted the board up so
I could remove the sticker backing.


Remove the sticker backing...

Carefully place the plaque back down
pressing on the left side again to keep it in place...

Press down on the strips to secure in
place...

And you're done!


You can download 21 Subway art designs
made just for this project, *made just the right size, by visiting my
blog Tips From a Typical Mom HERE.
**Note: These are designed to be
printed on an 8x10 print. I have sized them to be cut to the correct
measurements of the plaque. You will not have to resize them when ordering. You
will need to either cut them or sand the excess off the plaque when
finishing the project. I used my craft paper cutter to get a
straight line and cut it just a bit smaller than the plaque so I
could see the red border.
Enjoy your seasons!
Annette~ Tips From a Typical Mom
DOWNLOAD THE FREE SUBWAY ART HERE!
Do you just send these to a kinkos type place and have them printed on cardstock?
ReplyDeleteThese are gorgeous! Thank you for sharing!
ReplyDeleteMine bled all over. Do you print on cardstock?
ReplyDeleteGood article and a nice summation of the problem. My only problem with the analysis is given that much of the population joined the chorus of deregulatory mythology, given vested interest is inclined toward perpetuation of the current system and given a lack of a popular cheerleader for your arguments, I'm not seeing much in the way of change.
ReplyDeleteYou're the best
ReplyDelete