


We are excited for out first GUEST POST. Every Sunday evening through the summer we will have a guest post from a talented blogger showing off one their latest projects. This week Abbey kicks things off with a great kitchen organization project.
Hey everyone, I'm Abbey from The Cards We Drew and I'm so excited to be here today at Poppy Seed Projects! I was introduced to Poppy Seed last April at SNAP and I've been a HUGE fan of theirs ever since! Recently, I decided I needed to take some time to reorganize my kitchen and my bills, so I thought it would be really fun to incorporate Poppy Seed projects into my reorganization! Check out my makeover!
 Here's what my fridge was looking like before...I had bills, invitations, my son's artwork, and more scattered all over my fridge.
 Bills were just thrown in a basket on my countertop that I sorted every few days or so and decided on what to shred, throw out, and keep. I didn't really have any system of organizing our family clutter...and wanted to change that and make it fun at the same time. So here's what I did...
I took a 3 mini frames (Eleanor Frame) from Poppy Seed Projects, three plastic hanging shelves from Target, two large frames from Poppy Seed Projects and customized them with spray paint and scrap book paper to make my reorganization project unique!
Bills were just thrown in a basket on my countertop that I sorted every few days or so and decided on what to shred, throw out, and keep. I didn't really have any system of organizing our family clutter...and wanted to change that and make it fun at the same time. So here's what I did...
I took a 3 mini frames (Eleanor Frame) from Poppy Seed Projects, three plastic hanging shelves from Target, two large frames from Poppy Seed Projects and customized them with spray paint and scrap book paper to make my reorganization project unique!


 I made two spaces for my son to hang his artwork. I mod podged and hot glued clothespins onto the frames to hold his art in place.
 I bought a simple dry erase board from Target to keep a running list of groceries we run out of during the week.

 I created a second artwork spot on the fridge, as well, so that we could rotate old work out and replace it with the new stuff regularly rather than have tons of it pile up.
 My gift partner from Craftaholics Anonymous gave me that pretty monogram, which was perfect for my makeover project!
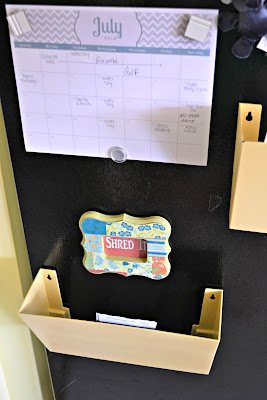
 My bins were labeled "Pay It", "Keep It", and "Shred It".

 Overall, I was able to use most of the side of my fridge, which will free up room on my counter that used to hold all this stuff!


Hey everyone, I'm Abbey from The Cards We Drew and I'm so excited to be here today at Poppy Seed Projects! I was introduced to Poppy Seed last April at SNAP and I've been a HUGE fan of theirs ever since! Recently, I decided I needed to take some time to reorganize my kitchen and my bills, so I thought it would be really fun to incorporate Poppy Seed projects into my reorganization! Check out my makeover!


After I spray painted my three bins and my three frames, I took them inside to use Poppy Seed's texturizing cream on them to give them a textured finish and adhere the scrapbook paper to my frames.

After I cut out my scrapbook paper for all my frames, I then went about adhering them onto the actual wood frame.


Now that the hard part was done, I got to organize my shelves and frames to fit our needs as a family. So I got to work attaching my pieces to the side of my fridge and using extra scrapbook paper and my Silhouette to make labels to put in our frames.
My fridge needs a place to keep bills, invitations/reminders/photos, and a place to put mail to shred. I also wanted to place to keep a family calendar, a special place to hang my son's artwork from daycare, and a place where we could leave each other notes and reminders. I was able to meet all of our needs and I think it turned out wonderfully. Check out the finished product....


I know my color choices may not be for everyone, but we have that color palette in our kitchen/living room, so it works well for us and is very functional, but fun at the same time. I'm so glad I got to use Poppy Seed projects to incorporate into my design and have a few other fun projects with them coming up!
Let's look at the before and after one more time!!

Please stop by my blog sometime to say hello and check out other projects I have in the works!
Thanks again to Poppy Seed Projects for having me!
A big thanks to Abbey for being our FIRST EVER guest post. Your organization suggestions are fantastic. I think you will be thrilled with the new calendars and organizational systems Poppy Seed will be annoucing on July 15th, they will be the perfect compliment to cute ideas!
Oh this is totally cute!!! LOOOOVE it!
ReplyDeleteGreat ideas!
ReplyDeleteLove the Valeta chocolate warmer. What a clever idea.
ReplyDelete